Christmas

This year I made one quilt specifically as a Christmas gift and I also gifted four previously made quilts.  

Gift 1

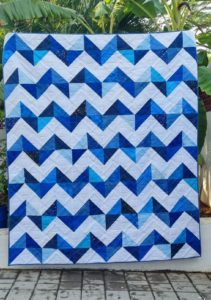
I made this quilt for my son’s girlfriend. I used a variety of blue fabrics that I already owned and some white from my local Chennai quilt shop “The Square Inch“. I chose the “By the Sea” quilt pattern from Missouri Star Quilt Co. It was made for 10″ squares and was quite simple to use.  

Gift 3

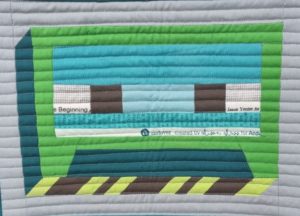
I made this cassette mini quilt for my husband using a portion of Lysa Flowers “Cassette” pattern. I had originally planned to do the whole thing, but I ran out of time and the pieces were very small. 

Gift 2

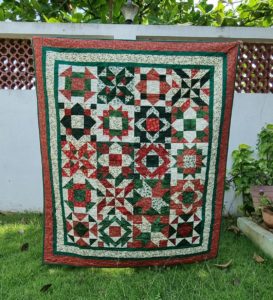
I made this quilt top last Christmas but it didn’t get quilted until after the holiday. I created a sampler using patterns from the pattern book Block Genius.  I titled this quilt, “Raven’s Surprise” because my daughter played with the blocks and when put them back in order I mixed up a few. After sewing it all together I noticed two of the same blocks  next to each other. Instead of taking it all out, I just decided to embrace the mistake. Can you see it?


Gifts for my sister

A couple years ago I started making blocks from 100 Modern Quilt Blocks from Tula Pink. I chose to make three different quilts.  I started making blocks using batik, some with Tula Pink fabric, and ones using regular quilting fabric. I laid out the blocks differently in all three quilts. For this one, I made a very thin sashing because I didn’t like how it looked without it but I didn’t have much of the sashing fabric and living in India, I was unable to order more. 


This quilt pattern: “Pretty Birds”, is from Elizabeth Hartman. I loved making it. Elizabeth Hartman makes such fun patterns. I also like how colorful her examples are. 

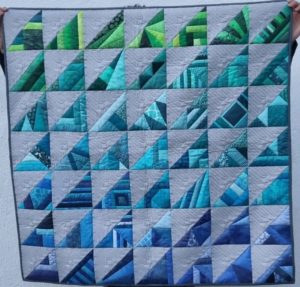
In between my other quilt projects I was working on “Year of Scrappy Triangles” by Leila Gardunia. This foundation paper piecing was vey fun. I learned a lot.

I made this space invader quilt pattern early in my career and used fabric that I would never use if I tried it today. I didn’t realize you should only use cotton and couldn’t find bright neon cotton in Chennai, India, so I bought what I could find. It turned out to be a polyester type fabric that was difficult to sew with and sometimes looks wrinkled.

Even though I don’t like the fabric I used, I love the pattern.  If you are looking to make a quilt for someone who is nostalgic, simply loves the 80’s, or is difficult to shop for, this quilt pattern could be the ticket.

This pattern consists of four different blocks: the Squid, the Crab, the Octopus, and an Explosion block. Each block is made from 1 3/4″ x 1 3/4″ squares in order to make the more pixelated design in keeping with the original game.

Finished product- Throw Quilt 57 1/2″ x 48″

Check out my etsy listing. 


Today I made some woven Christmas ornaments for my daughter’s teachers and a few colleagues. If you have the right tools, this is quite easy. I watched Mr. Domestic’s video to learn how and whipped up seven in a weekend. They are a bit time consuming, but definitely worth it. He also has another video for no sew ornaments, but I haven’t tried that yet.

1st: Pick fabric. I prefer to pick two fabrics that contrast well such as a light and a dark. Also, Iprefer to use fabric with no or very small patterns. I find the larger patterns detract from the finish product as you can’t really see the design anyway.

2nd: Cut the cloth at 1 1/2″ x wof.  (You will need @ two for each star- You’ll be cutting them into 5″ pieces and will need 8 of one and 12 of the other)

3rd: Iron the fabric as if you are making bias- so outsides into the center. Then I fold it in half and iron again.


4th: Sew the pieces on both the left and ride sides. I do the open edge first and try to sew as close to the edge as possible. My seams are never perfectly straight but you won’t really notice in the end unless you’ve gone really off.

5th: Cut the strips into 5″ pieces. You will need 8 of one color and 12 of the other. 

6th: Get out your wefty, pins, and either craft foam or a cushioned iron/cutting mat. You then pin three of one color next to each other, then put one of the off color on each end. Use your wefty to weave through three of the main color and then the other two off colors, pinning them down after each time. Reminder: When you weave you have to go opposite for each one. Ex. over, under, over, under, over. and then the next one would be under, over, etc.    Do this twice. You need two of these to make the final piece.

.

7th: Unpin the the two off colors on one corner and glue (I like Aleen’s fabric glue) down where they overlap. Then take the ends and glue them together and use a clip to keep them set. See photo. then do the same to the next ones in. Repeat this for each corner.


8th: After waiting for the glue to dry, take out the pins and take off the clips. Put the two pieces together with the loops facing in. Then weave the ends you didn’t glue, through the loops of the opposite star. Glue the end of the strip into the outermost loop, making sure to get the edge to the point of the loop. You will be cutting off excess and it needs to cover the whole back. Use a clip to keep it in place.


9th: After the glue is dry, take off the clips and snip away and extra fabric that is peaking outside of the loop. Then choose one to put a ribbon on and you are done.